Disclaimer – I totally stole this idea from a friend! But I get asked often how I did it so that my friends can use it too!
We are a military family, therefore many of our friends are also military. Which means they move, a lot. Their addresses are changing every few years and it gets hard to keep track of. But every year I really enjoy seeing holiday cards come in from all over with photos of their families to decorate my fridge with. I was looking for an easy way to manage my address book that was easy to edit and didn’t require me to go through and ask each individual family for their new addresses.
Then one year I watched my friend post to Facebook asking for people to update their addresses all on their own using a link to a Google Form. Brilliant! I live in Google. My whole world revolves around all of their apps to make my life more efficient and even better, it ends up in my beloved spreadsheet form!
Now yearly I post this to gather everyone’s addresses, asking both for new and updated people to fill out the form for me. This also helps keep it from being awkward if people don’t want to send/give a holiday card. Completely optional. I personally think it is best to give your address in return to anyone who has shared theirs with you.

Also, I want to note, this was super helpful when it was wedding time, being able to send out save the dates and invitations was easy because I already had all the addresses in a spreadsheet to use for the address label maker.
Here are step by step instructions on how to set up an address book using Google Forms for your holiday cards.
Step 1: Create a Google Form
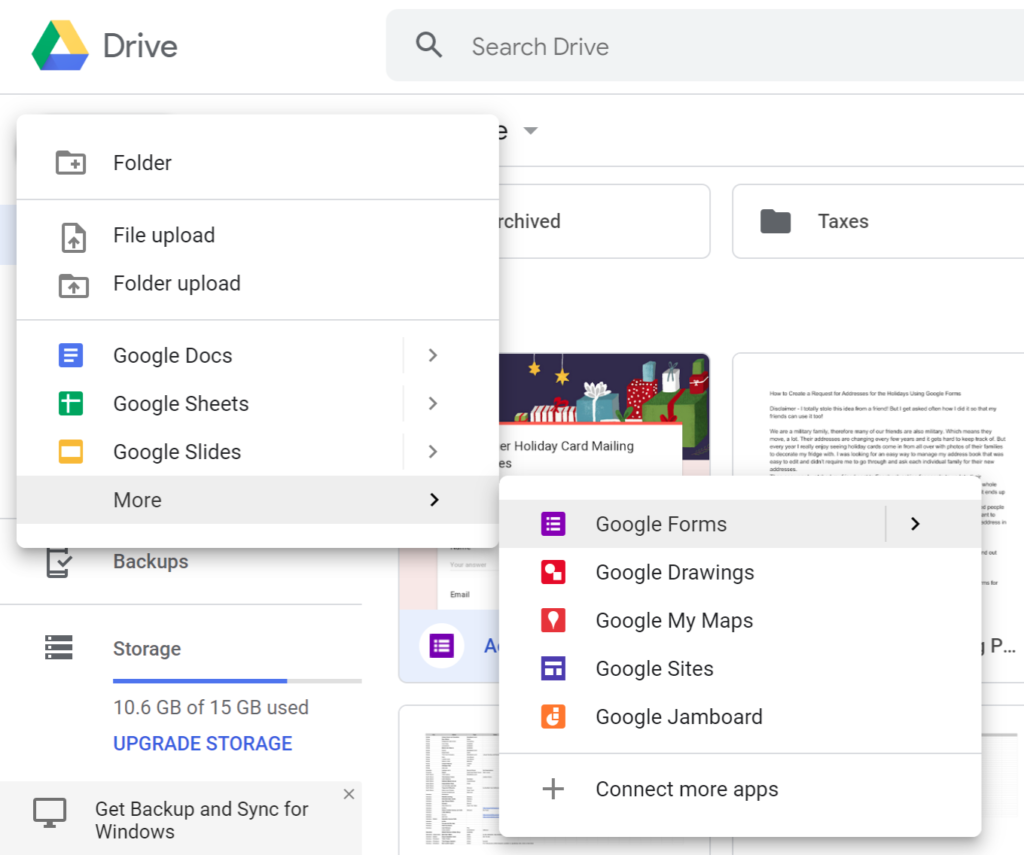
Go into your Google Drive by selecting the nine-dot icon in the upper right corner of your Google webpage. Once in Google Drive, select “NEW” and use the drop down menu to create a new Form.

Step 2: Title, Description, and Questions
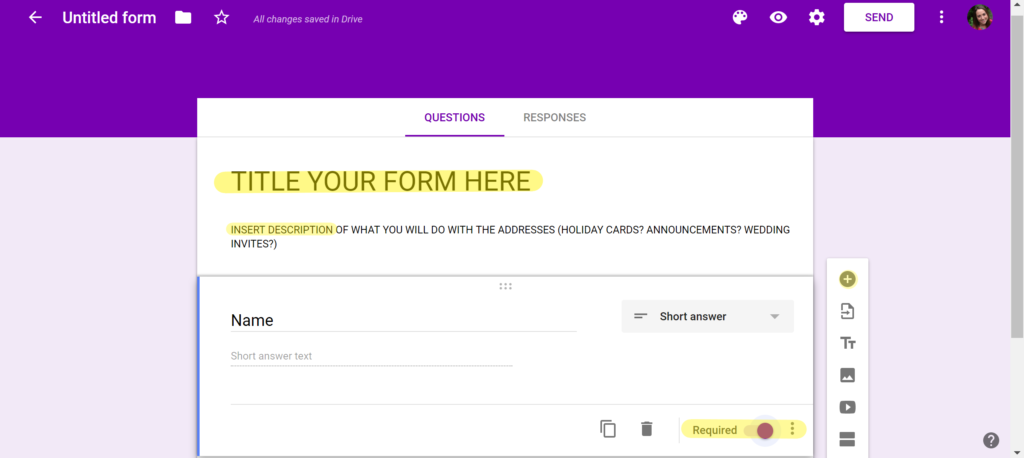
Title the form and add a description explaining why you are collecting addresses and how they will be used. I also choose to include in this section how they can get our address for sending holiday cards in return! Use the “+” button on the right menu bar to add additional questions to your form. Google will ‘magically’ update the answer format for you, but if you would like to change it, there is a drop down menu next to the question you create. If you want to make the answer a requirement, select the button at the bottom of each question.

My personal Form is quick and simple with Name and Address as required answers and Email Address as an optional one.
Step 3: Personalization
You can choose your color palette and optional images to put on the header to customize your Google Form by choosing the paint pallet in the top menu bar. This will open a Theme Options sidebar with color options, fonts, and a header image option. If you are looking to have an image in the header, select “Choose Image”. *hint* there are holiday options under “Illustrations”. You will also be able to change the Font style and background color in the Theme Options bar.
Step 4: Confirmation Message
Sharing is caring! Part of the fun of sending holiday cards is getting one in return. So in the confirmation message I always include our address. To do this, click the gear button in the upper right menu to locate Settings. Within the pop-up window, select “Presentation”. There write a confirmation message and include your address.
Step 5: Collect Responses
So admittedly, I live in spreadsheets. Even my wedding was organized in one. So I love that Google Forms gives you the option to have all the answers populated into a manipulatable spreadsheet. To do this, select “Responses” at the top of the Form. Then select the little Google Spreadsheet icon in the right corner. A new window will pop up and ask if you would like to create a new spreadsheet or add the answers to an existing one. Create a new spreadsheet and give it a title. From here forward, you’ll be able to see the responses by either hitting that “Responses” tab at the top of your Google Form or by opening your Google Spreadsheet in your Google Drive.

Step 5: Share
Finally, share your form to get people’s addresses. To do this, click the “Share” button in the upper right corner of your form. This will open a box with sharing options; email, link, and embed HTML. Select the link option and copy the link onto your clipboard. You may either use this to then paste onto social media or use the share on social media buttons to the right.

There you go! I hope you found this helpful and it makes your holiday card season easier.
Do you have any other holiday card hacks? Comment below. I’d love to hear your ideas!
